

Message privacy, increasingly important to Bitcoiners, can be achieved with public and private key cryptography.
As a Bitcoiner, you’re going to need a secure way to communicate privately, without relying on a company to encrypt your data for you. For example, freely available methods with end-to-end encryption like Telegram (not with its default option) and Signal and others are easy to use, but I don’t completely trust them.
This article will show you how to send messages using free open-source software, GNU Privacy Guard (gpg), which allows encryption and decryption using public and private key cryptography. It’s more tricky at first to DIY, but once you get the hang of it, it’s not that hard. I’ll take you through it step by step, just follow along and bookmark this article for future reference.
This is a little more background about gpg (including pgp) for those who wish to dig deeper. It’s of interest to note that public and private key cryptography is not only used for encryption and decryption, but also used for the verification of digital signatures — used in Bitcoin transactions and also data in general (e.g., checking if the software you downloaded is genuine and not tampered with, as shown in the first video here).
How It Works
To make a public and private key pair, your computer generates a very large (“unguessable”) random number from which the gpg software will create for us a private key, and from that, a public key is created (just like Bitcoin private keys, more info here).
The public key is shared with the world (like a Bitcoin address) and contains your ID (email and name) which you publish online. Here is mine. Think of the public key like an open safe. Anyone can write a message and encrypt that message with your PUBLIC key (i.e., put it in your safe and lock the door shut) — only you have the private key and, therefore, only you can open your safe (i.e., decrypt and read the message).
A side note: Don’t worry about this for now — just note that, in Bitcoin, there is no “encryption” going on with payments. Instead, there are “signatures” made with private keys, which can be “verified” by anyone using public keys.
Overview
In this guide, I’ll take you through the following steps:
- Download gpg.
- Make your own private and public key.
- Store your private key to a USB drive.
- Upload your private key to your other computer’s’ keychain.
- Upload your PUBLIC key to a keyserver and/or your website.
- Upload your public key’s fingerprint to your online profile, e.g., Twitter or Keybase.
- Send me a message encrypted with my public key, and I will reply encrypting with your public key.
Download GPG
The first thing you’ll need to do is download the gpg software.
Linux
If you’re using Linux, gpg should already be installed. If not, you can install it with the command:
sudo apt-get install gnupg
If you just want to check if it’s installed, type this:
gpg –version
HINT: If you’re running a Bitcoin Node on a Raspberry Pi, you can actually use SSH to access your Pi’s terminal and run gpg commands like that. If what I said makes no sense, don’t worry, ignore it, it’s outside the scope of this article.
Mac
If you have a Mac, you’ll need to download and install “GPG Suite” — it’s free unless you also want the email tools (no need). This will give you the command line tools you need.
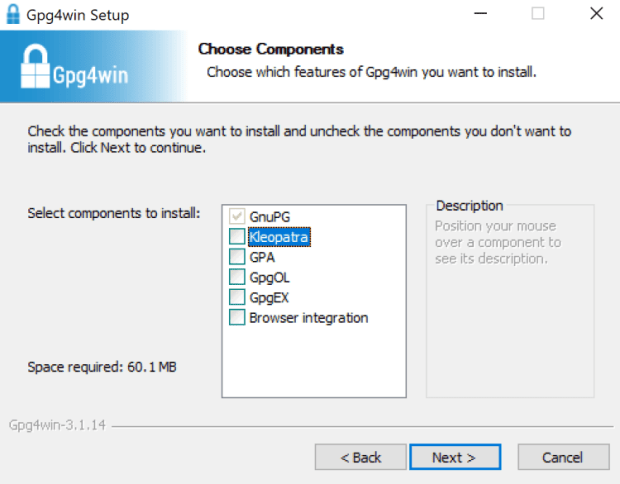
Windows
Download and install “Gpg4Win.” It’s free. There is a donation page before downloading, you can select $0 to proceed.
When installing, you can uncheck all the boxes except the first.
Make Your Own Private and Public Key
Open the terminal in Mac or Linux or command prompt in Windows.
Type:
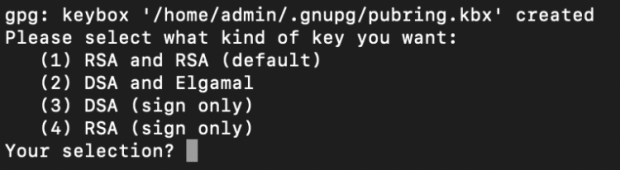
gpg –full-generate-key
Choose the default RSA option.
Then choose the size of your key. Bigger is more secure.

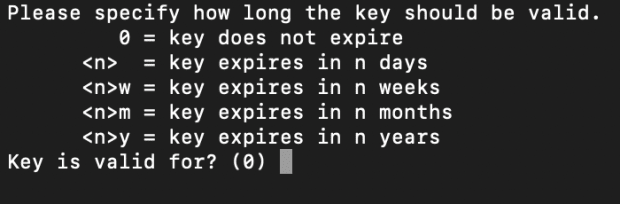
Then select how long the key should be valid. I prefer not to let the key expire.
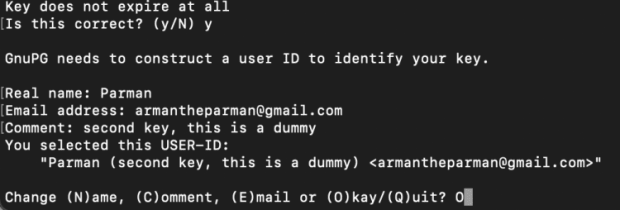
Then you’ll fill out some personal details. This will be made public so people know who the public key belongs to. The data actually gets embedded into the key. Choose “O” for “Okay” to proceed.
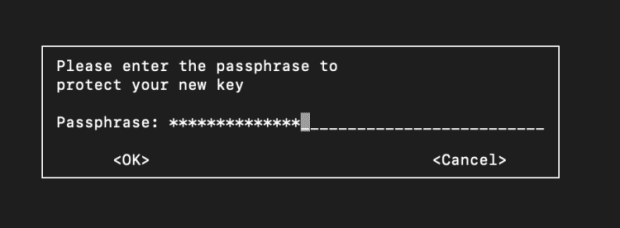
Then lock your private key with a “passphrase.”
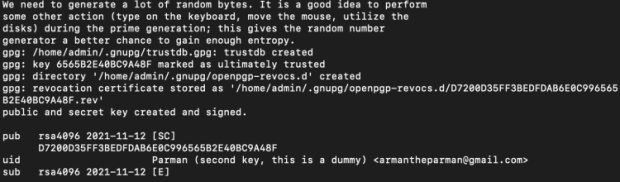
I was advised to move the mouse around or type on the keyboard during key creation to add some extra randomness to the key. These are the details of the key I created (at the bottom).
Store Your Public Key To A USB Drive
The computer you used to create the private key has the key in its “keychain,” and it’s locked with a passphrase. The keychain is just an abstract concept — the key(s) are actually just stored in a file somewhere.
I suggest you backup your private key to a USB thumb drive. This allows you to copy it to a different computer if needed and reduces the risk of loss.
To do that, we first have to export it from the keychain and put it into a file.
Start by getting the key’s ID:
gpg –list-keys
This shows you all the keys (public and private) in your computer’s keychain.

Copy the key ID to the clipboard. Mine is:
D7200D35FF3BEDFDAB6E0C996565B2E40BC9A48F
Then we export the public keys to a file, and we need to put the key ID in the command (that’s why we copied it to the clipboard).

The above command uses gpg and has some options.
The “–output” option specifies that the output should go to a file, provided straight after.
I chose “public.gpg” ias the name of the file, and it will be created as the command is executed.
“–armor” specifies the output should be in ASCII-armored format and “–export” specifies which key from the keychain should be exported, provided straight after.
If you want to see the contents of the file, just use the “less” command (‘q’ exits the ‘less’ function):
less public.gpg
Next, let’s export the private key. The command is like the one before with some adjustments. Change the file name to something like “private.gpg” and change the “–export” option to “–export-secret-key.”

We now have “public.gpg” and “private.gpg” files in the current directory. Copy them to a USB drive and keep them safe and hidden. It’s not as sensitive as a Bitcoin private key, but the loss or theft of the “private.gpg” file would allow someone to impersonate you. If your passphrase is strong, it’s unlikely an attacker will be able to use your private key even if they got their grubby hands on it.
Upload Your Keys To Your Other Computer’s Keychain
Take your USB drive with your private key to your other computer. Make sure gpg is installed. Open a terminal and navigate to the location of your file. Enter the command:
gpg –import private.gpg
Remember “private.gpg” is a file name, so replace that with your file’s name, don’t just blindly copy the command without thinking. You will be asked to enter the passphrase, and then the private and public keys will be imported in one go.
To delete the private key, the command is:
gpg –delete-secret-keys KEY_ID
Substitute KEY_ID for the key ID or email of your key.
Upload Your PUBLIC Key To A Keyserver And/Or Your Website
There are several popular keyservers in use around the world. The major keyservers synchronize themselves just like Bitcoin nodes do, so it is fine to pick a keyserver close to you on the internet and then use it regularly for sending and receiving keys (PUBLIC keys, of course).
gpg –keyserver keyserver.ubuntu.com –send-key D7200D35FF3BEDFDAB6E0C996565B2E40BC9A48F
The above command is on one line. There is a space after “–send-key” which may not be obvious as the formatting on your browser may break the line into two.
“–keyserver” is an option that expects the web address of a keyserver next.
“–send-key” is an option that expects a Key_ID.
If you want to import a public key of someone else directly from a keyserver, enter the above command but change “–send-key” to “recv-key,” and use his or her Key_ID.
Upload Your Public Key’s Fingerprint To Your Twitter/Keybase
What’s the point of this? If you display a short version of your public key in various places, someone sending you a message can be more certain that they are downloading the correct public key.
You can see your key’s fingerprint with this command:
gpg –fingerprint KEY_email
With most of these commands, sometimes an email will work, sometimes it needs the exact KEY_ID. You can always see what your KEY_ID is with:
gpg –list-keys
Once you see your fingerprint, copy it and paste it into your online profiles as I have done on Twitter.

When you download my public key, the fingerprint will be displayed after you import it, or if you use the “–list-keys” command, or “gpg –fingerprint Key_ID”.
You can then check the output with my online profile to make sure you have the correct key.
Send Me A Message Encrypted With My Public Key, And I Will Reply Encrypting With Your Public Key
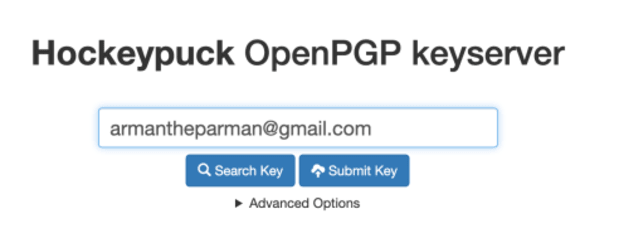
First, you’ll need to get my public key. You can browse to keyserver.ubuntu.com, and enter my email into the search field.
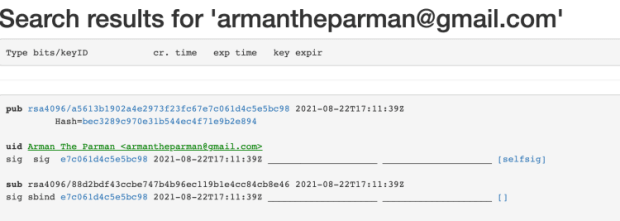
Or you can visit my contacts/gpg page and follow instructions there. Copy my Key_ID to the clipboard.
Open a terminal and enter this command:
gpg –keyserver keyserver.ubuntu.com –recv-keys e7c061d4c5e5bc98
You now have my public key imported to your computer’s keychain.
Now you can type a letter to me in a text file (letter.txt) or Word document (anything, really) and save it to disk. In a terminal, navigate to where you stored the file. Then type this command:
gpg –output letter.gpg –encrypt –recipient armantheparman@gmail.com letter.txt
Here you’ve got a command which will be all on one line. The “–output” option lets you create a filename typed immediately afterward, where the encrypted data will go.
The “–encrypt” option is an instruction to encrypt.
The “–recipient” option allows you to choose which public key in your keychain to use to encrypt the message. Immediately afterward, if you type in an email address, it will choose the right key from your keychain.
Finally, following the email or Key_ID, you put the name of the file you want to encrypt.
You might get some warnings and confirmation messages, but after that, you should have a new file called “letter.gpg” or whatever filename you chose. The original file still exists (“letter.txt”). You can delete that file with (using Linux or Mac):
rm letter.txt
You can also clear the history of the command prompt with:
history -c
You can then send an email and attach “letter.gpg” and send it to me. When I receive it, I will download it to disk first, then use this command to decrypt the file:
gpg –output decrypted_message.txt –decrypt letter.gpg
This will create a new file “decrypted_message.txt” using the encrypted data from “letter.gpg.” The computer can read which public key encrypted the data (so I don’t need to specify a Key_ID), and it can see it has the private key to that public key in the keyring, so it can use it to decrypt the message.
Conclusion
I’ve shown you the steps to create a private and public key for yourself, encrypt a message with my public key, and send me the message which I will decrypt with my private key.
If you send me your public key, or instructions to get it, I can encrypt a message and send you a message if you like.
Give it a go!
This is a guest post by Arman the Parman. Opinions expressed are entirely their own and do not necessarily reflect those of BTC Inc or Bitcoin Magazine.